
Selling on Shopify Without Mindbody Payment Processing: The Buy-First, Book-Second Journey
For ShopConnect accounts that sell on Shopify without Mindbody payment processing: how to over-communicate across Shopify and Mindbody emails so customers who buy in Shopify know to log in and book in Mindbody as a second step.
Overview
ShopConnect syncs purchases made in your Shopify store into Mindbody. For most accounts, the customer pays in Shopify and the order flows into Mindbody as a completed sale tied to their Mindbody client record.
For accounts where Mindbody merchant processing isn't available in your region — or simply isn't enabled — the flow works differently. Because payment can't be processed through Mindbody, the experience becomes "buy first, book second":
- The customer buys the class, package, or membership in your Shopify store (your Shopify gateway handles payment).
- ShopConnect creates or matches their Mindbody client record and records the purchase.
- The customer then books their class or appointment in Mindbody — and Mindbody walks them through setting up their login right as they book.
The fix is to over-communicate at the two Shopify touchpoints (the Thank-you page and the order confirmation email) so the customer knows to go book — and to let Mindbody handle the account and password inline at booking, so there's no separate "password email" to chase.
How a customer books (the inline flow)
When the customer taps Book in your Mindbody booking widget, Mindbody takes over:
- It asks for their email — they enter the same email they used for the Shopify order.
- Mindbody finds the client record ShopConnect already created (it just has no password yet) and prompts them to create a password — their name and email are already on file.
- It verifies their email with a code, then completes the booking. The purchased spot is already on file, so there's nothing more to pay.
Because Mindbody handles the password during booking, you do not need to send the Mindbody "password reset" email — see Turn off the Mindbody password-reset email below.
The core message (use it on both Shopify touchpoints)
This is the message to put on the Thank-you page and in the order confirmation email. It's yours to edit — adjust brand name, tone, and the booking-page link.
Your purchase is already on file. We use **Mindbody Online** as our booking software, so here's how to book your class or appointment: **(1)** Go to our **Book Now** page. **(2)** Pick your class or appointment and tap **Book**. **(3)** The Mindbody sign-in takes over — sign in with the email you used for this order, create a password, and enter the verification code Mindbody emails you. That's it — you're booked, with nothing more to pay!
The journey at a glance
| # | System | Touchpoint | Role in the journey |
|---|---|---|---|
| 1 | Shopify | Thank-you / Order status page | On-screen the instant checkout completes — tell them how to book (go to Book Now; Mindbody sets up the login inline). |
| 2 | Shopify | Order confirmation email | The same message in their inbox. |
| 3 | Mindbody | The booking itself | The customer books in your Mindbody widget; Mindbody has them set a password + verify a code inline. No password-reset email needed. |
Both Shopify touchpoints are editable on every Shopify plan — the Thank-you page via the checkout editor (the free Checkout Blocks app), the Order confirmation email via Settings → Notifications.
1. Shopify — Thank-you / Order status page
The moment checkout completes, Shopify shows the customer an on-screen Thank you page — the highest-attention point in the journey, and the best place to tell them how to book.
Where to edit
- In your Shopify admin, go to Settings → Checkout and click Edit on your active checkout configuration to open the Checkout & Accounts editor.
- The Thank-you page has no built-in text block, so install Shopify's free Checkout Blocks app (free on Basic and up for the Thank-you / Order status pages).
- On the Thank you page, Add block → Checkout Blocks → Static content, drag it just below Confirmation, set Content type to success banner, and fill in the Title + Description below. Save.
Ready-to-paste copy
Title:
🎉 Order complete — now book your spot!
Description:
Your purchase is already on file. We use **Mindbody Online** as our booking software, so here's how to book your class or appointment: **(1)** Go to our Book Now page → https://your-store.example/pages/book-now **(2)** Pick your class or appointment and tap Book. **(3)** The Mindbody sign-in takes over — sign in with the email you used for this order, create a password, and enter the verification code Mindbody emails you. That's it — you're booked, with nothing more to pay!
The Static content Description auto-links a pasted URL, so put your Book Now page URL on its own line (it can't be a hidden hyperlink). Replace https://your-store.example/pages/book-now with your real booking page.
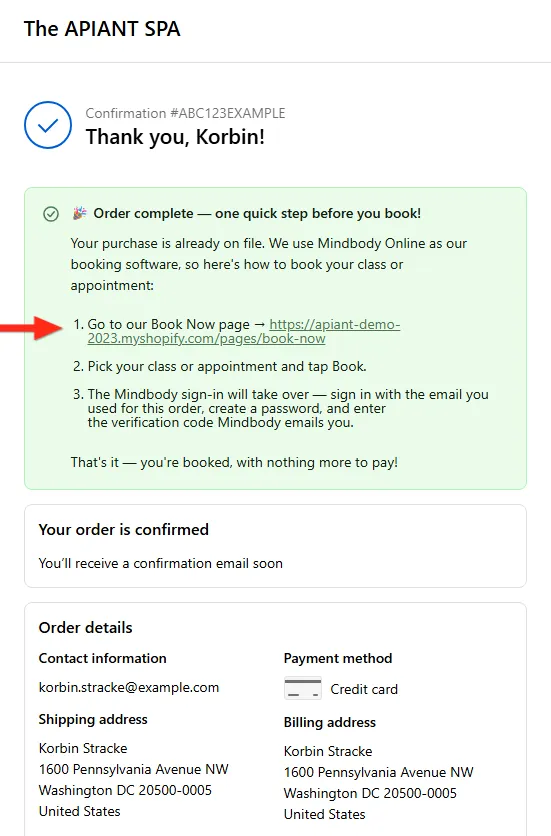
Example: the Thank-you page success banner — the customer sees this the instant checkout completes, before any email arrives.
2. Shopify — Order confirmation email
The email that arrives seconds after checkout. Carry the same message here.
Where to edit
- Settings → Notifications → Order confirmation → Edit code.
- Add the message near the top of the body.
Thank you for your purchase! We use **Mindbody Online** as our booking software. To book your class or appointment, head to our booking page — when you tap **Book**, the Mindbody sign-in takes over: sign in with the email you used for this order, create a password, and enter the verification code Mindbody emails you. Your purchase is already on file, so there's nothing more to pay.
Place this outside any {% if requires_shipping %} block, or it won't appear on no-shipping service orders (and Shopify's "Send test" uses a shippable sample order, so it won't reveal that gap — test with a real $0 service order). A ready-made template with a service-vs-retail split is in the repo at docs/shopify-order-confirmation-email.liquid.
Turn off the Mindbody password-reset email
Because Mindbody now walks the customer through setting their password during booking (the inline flow above), the Mindbody "password reset / login information" email is redundant — and worse, confusing: even a customer who sets a password from that email is still prompted to create one in the widget, because the two flows don't link.
Recommendation: turn it off. In ShopConnect, set Send_mbo_password_reset_email → Disabled. That trims the customer's inbox to just the order confirmation and Mindbody's verification-code email (sent during booking).
This is the same setting covered in Managing the Sending of the Mindbody Password Reset Email — for this buy-first-book-second / inline-booking scenario, set it to Disabled (the opposite of that article's default). Also check Mindbody's automated emails for a "Finish creating your account" message and disable it if you'd like the cleanest inbox.
Where should the booking link point?
Every "Book Now" link needs a destination: a web page with your Mindbody scheduler embedded. Mindbody provides this through Branded Web tools — embeddable widgets for your class schedule, appointment booking, registration, and more. You add one to a page by pasting a snippet of code. There is no standalone hosted booking URL, so the link points to a page you control with the widget embedded. Two good places to host it:
- Option 1 — A "Book Now" page inside Shopify (for Shopify-only stores). Available on Basic, Grow, Advanced, and Plus (any plan with Online Store 2.0 themes; not the lightweight Starter plan). Create a Shopify page, embed the Branded Web widget via a Custom Liquid section (Shopify's page editor strips
<script>, so it must go in Custom Liquid), and add the page to your menu. Full step-by-step (with screenshots): How to Add a Mindbody Booking Widget to Your Shopify Store. - Option 2 — Your own website. Embed the Branded Web widget on a page there and point the link to it.
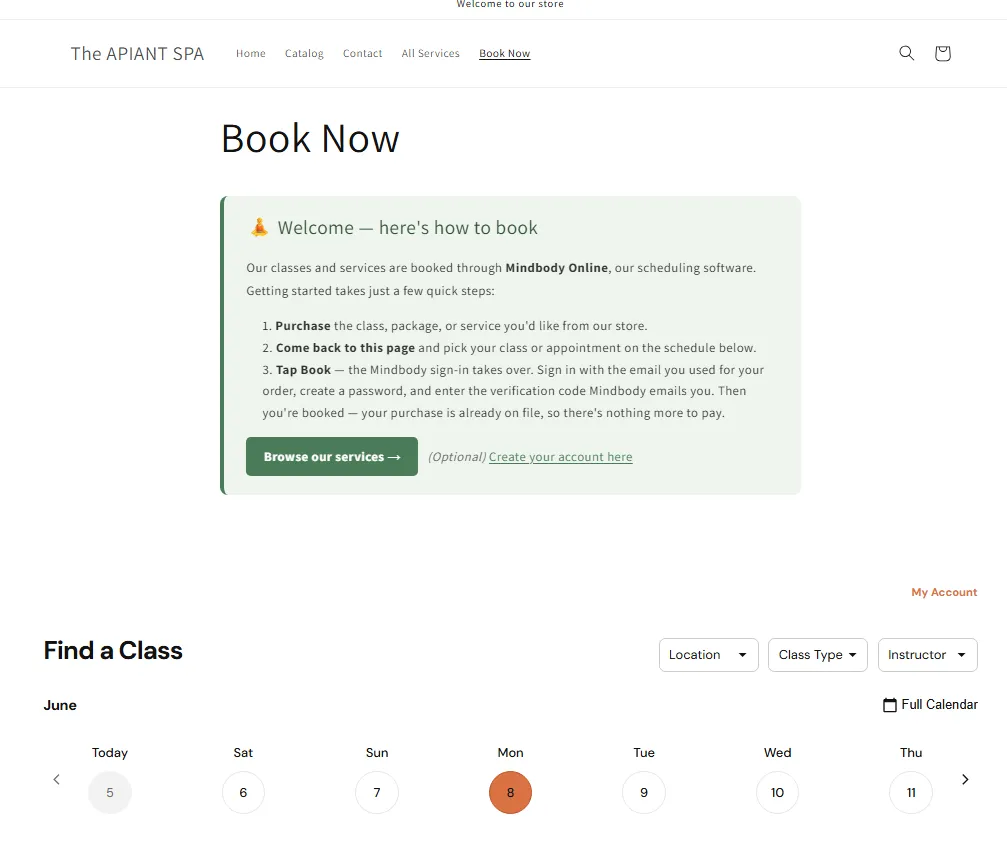
Example: a Shopify "Book Now" page — a short how-to-book panel plus the Mindbody schedule widget. Customers land here from the Book Now links to book.
Branded Web widgets are embed-only — you paste a code snippet into whichever page you choose. See Mindbody's guide on putting branded web tool widgets on your site.
Putting it together
When both Shopify touchpoints carry the same message, the customer sees one coherent story:
- Thank-you page (on screen): "Order complete — go to Book Now and book; Mindbody will set up your login as you book."
- Order confirmation email: the same, in their inbox.
- Mindbody booking: they pick a class, sign in with their order email, create a password, verify with a code — booked. The purchase is already on file.
No separate password email, no manual data entry, no missed sales.
Related settings & articles
- How to add a Mindbody booking widget to your Shopify store — the booking-page build. See the widget guide.
- Try it yourself — experience the whole flow on your phone: Try It Yourself: Experience the Buy-First, Book-Second Journey.
Send_mbo_password_reset_email— for this scenario, set it to Disabled. See Managing the Sending of the Mindbody Password Reset Email.