
How to Add a Mindbody Booking Widget to Your Shopify Store
Step-by-step: embed a Mindbody Branded Web booking (or registration) widget on a page in your Shopify store using a Custom Liquid section, and add it to your store menu.
Overview
This guide shows how to embed a Mindbody booking widget — your class schedule, appointment booking, or registration form — directly on a page in your Shopify store, so customers can browse and book without leaving your site.
It pairs with Selling on Shopify Without Mindbody Payment Processing, where this page becomes the destination for the "click here to book" links in your customer emails — but it's useful for any store that wants an on-site booking page.
These steps assume an Online Store 2.0 theme — we used Dawn as the example. Your theme and admin layout may look slightly different, but the flow is the same. The screenshots below are from our demo store.
Before you start
You'll need:
- A Mindbody Branded Web widget — create and copy yours in Mindbody. See Mindbody's guide on putting branded web tool widgets on your site. A widget is a small snippet of code that looks like this (your
data-widget-idwill be unique to your business):
<div class="mindbody-widget" data-widget-type="Schedules" data-widget-id="XXXXXXXXXXX"></div>
<script async src="https://brandedweb.mindbodyonline.com/embed/widget.js"></script>
- A Shopify plan that includes the online store — Basic, Grow, Advanced, or Plus (not the lightweight Starter plan, which has no theme sections).
- Admin access to your Shopify store.
Shopify's page Content editor strips out <script> tags, so you can't simply paste a widget into a page's body. You'll add it through a Custom Liquid section in the theme editor instead (Step 3), which does run scripts.
Step 1 — Create the page
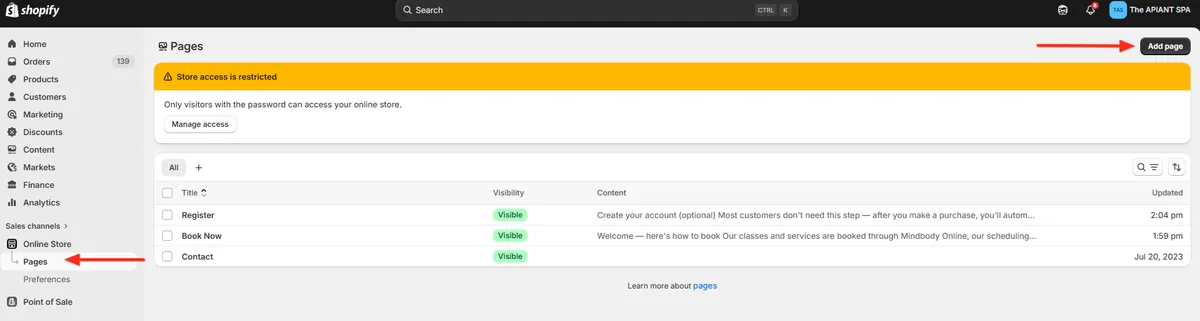
- In your Shopify admin, go to Online Store → Pages → Add page.
- Give it a title — for example Book Now. This sets the page URL (e.g.
/pages/book-now). - (Optional) In the Content box, add a short "here's how to book" introduction for your customers. Save.
📘 Shopify Help: Creating and editing pages
Step 2 — Give the page its own template
The widget lives in a theme section, so the page needs a template you can add sections to:
- In the page editor, find the Template dropdown on the right → Create template.
- Name it (e.g.
book-now), based on Default page, and create it. This assigns the page to the new template. - Save.
📘 Shopify Help: Templates
Step 3 — Add the widget with a Custom Liquid section
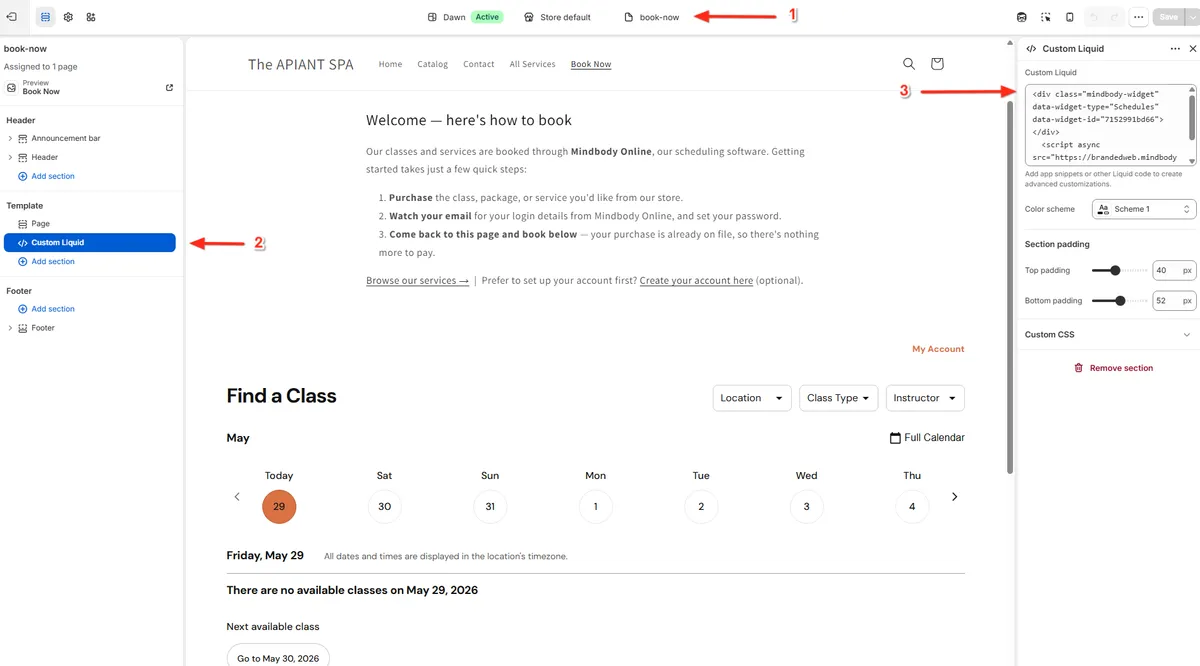
- Go to Online Store → Themes and click Customize (the Edit theme button) on your live theme.
- Use the page dropdown at the top to switch to your new page/template.
- In the left panel, click Add section → Custom Liquid.
- Paste your Mindbody widget code into the Custom Liquid box, then Save:
<div class="mindbody-widget" data-widget-type="Schedules" data-widget-id="XXXXXXXXXXX"></div>
<script async src="https://brandedweb.mindbodyonline.com/embed/widget.js"></script>
The widget should render right in the editor preview.
📘 Shopify Help: Customizing sections in the theme editor
Step 4 — Make the page visible
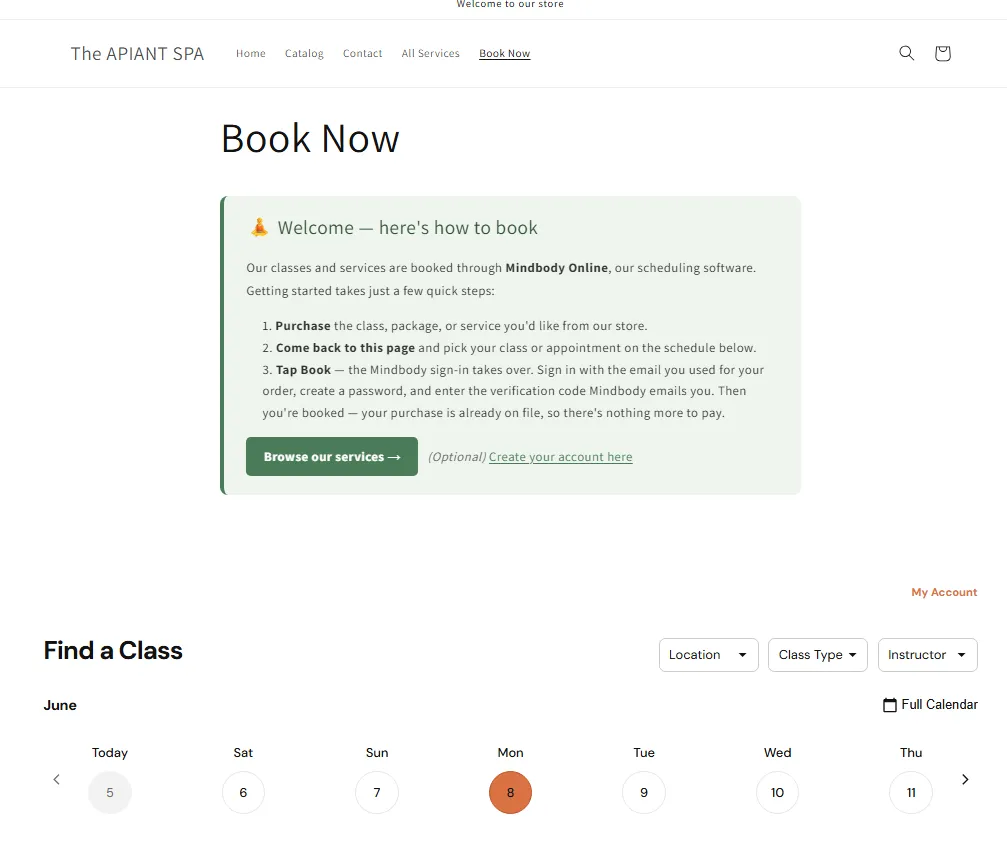
In Online Store → Pages → [your page], set Visibility → Visible and Save. Open the page's URL to confirm the widget loads for visitors. Here's how the finished page looks on our demo store:
📘 Shopify Help: Creating and editing pages
Step 5 — Add the page to your menu
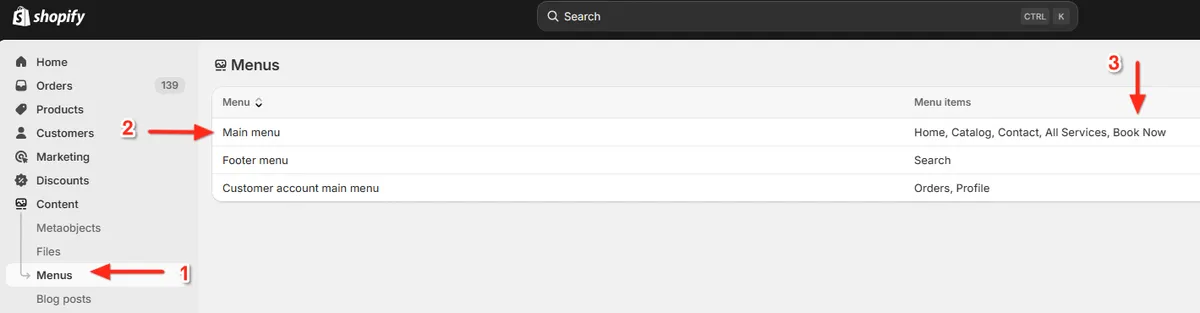
- Go to Online Store → Navigation (or directly:
admin.shopify.com/store/<your-store>/menus). - Open your Main menu → Add menu item.
- Name it (e.g. Book Now), link it to the page you created, click Add, then Save.
📘 Shopify Help: Add, remove, or edit menu items
Optional — add a Registration page too
Mindbody also offers a Registration widget (new-client account sign-up). Because it asks for a lot of details up front, most customers won't need it — Mindbody sets up their account inline the first time they book — but you can offer it on a separate page and link to it from your booking page. Repeat Steps 1–4 on a new Register page using your registration widget:
<script src="https://widgets.mindbodyonline.com/javascripts/healcode.js" type="text/javascript"></script>
<healcode-widget data-type="registrations" data-widget-partner="object" data-widget-id="XXXXXXXXXXX" data-widget-version="0"></healcode-widget>
Then cross-link the two pages — e.g. a "Create your account" link on the booking page, and a "Back to the booking calendar" link on the registration page — so customers can move between registering, browsing your services, and booking.
Related
- Selling on Shopify Without Mindbody Payment Processing: The Buy-First, Book-Second Journey — where this booking page becomes the destination for the "book here" links in your customer emails.